Latest Entries »

Install these tools using apt.

sudo apt-get install freeglut3-dev build-essential libx11-dev libxmu-dev libxi-dev libgl1-mesa-glx libglu1-mesa libglu1-mesa-dev 

To avoid problems in driver installation process, you may want to put this on blacklist.

sudo nano /etc/modprobe.d/blacklist.conf
blacklist amd76x_edac
blacklist vga16fb
blacklist nouveau
blacklist rivafb
blacklist nvidiafb
blacklist rivatv

Update/Install Nvidia card drivers

sudo apt-add-repository ppa:ubuntu-x-swat/x-updates
sudo apt-get update
sudo apt-get install nvidia-current

Download links: cuda-downloads

Cudatoolkit:
Make the cudatoolkit_4.2.9_linux_64_ubuntu11.04.run executable.

chmod +x cudatoolkit_4.2.9_linux_64_ubuntu11.04.run

Execute cudatoolkit_4.2.9_linux_64_ubuntu11.04.run.

sudo ./cudatoolkit_4.2.9_linux_64_ubuntu11.04.run

Software Development Kit:
Make the gpucomputingsdk_4.2.9_linux.run executable.

chmod +x gpucomputingsdk_4.2.9_linux.run

Execute gpucomputingsdk_4.2.9_linux.run

sudo ./gpucomputingsdk_4.2.9_linux.run

Pyrit:

wget http://pyrit.googlecode.com/files/cpyrit-cuda-0.4.0.tar.gz
tar xvzf cpyrit-0.4.0.tar.gz
cd cpyrit-0.4.0
python setup.py build
sudo python setup.py install

Error 1:

running build
running build_py
running build_ext
building 'cpyrit._cpyrit_cpu' extension
gcc -pthread -fno-strict-aliasing -DNDEBUG -g -fwrapv -O2 -Wall -Wstrict-prototypes -fPIC -I/usr/include/python2.6 -c cpyrit/_cpyrit_cpu.c -o build/temp.linux-x86_64-2.6/cpyrit/_cpyrit_cpu.o -Wall -DVERSION="0.3.1-dev (svn r278)"
cpyrit/_cpyrit_cpu.c:37:18: error: pcap.h: No such file or directory

Solution: install libpcap-dev

sudo apt-get install libpcap-dev

Error 2:

/usr/local/lib/python2.7/dist-packages/cpyrit/cpyrit.py:63: UserWarning: WARNING: Version mismatch between module 'cpyrit._cpyrit_cpu' from '/usr/local/lib/python2.7/dist-packages/cpyrit/_cpyrit_cpu.so' ('0.4.0') and module 'cpyrit._cpyrit_cuda' from '/usr/local/lib/python2.7/dist-packages/cpyrit/_cpyrit_cuda.so' ('0.3.0')

  "('%s')\n" % (_cpyrit_cpu, _cpyrit_cpu.VERSION, mod, ver))

Solution: remove this file then recompile

sudo rm /usr/local/lib/python2.7/dist-packages/cpyrit/_cpyrit_cuda.so
pyrit list_cores
Pyrit 0.4.0 (C) 2008-2011 Lukas Lueg http://pyrit.googlecode.com
This code is distributed under the GNU General Public License v3+

The following cores seem available...
#1:  'CUDA-Device #1 'GeForce 8600 GT''
#2:  'CPU-Core (SSE2)

pyrit benchmark
pyrit benchmark
Pyrit 0.4.0 (C) 2008-2011 Lukas Lueg http://pyrit.googlecode.com
This code is distributed under the GNU General Public License v3+

Running benchmark (1698.4 PMKs/s)... | 

Computed 1698.40 PMKs/s total.
#1: 'CUDA-Device #1 'GeForce 8600 GT'': 1492.7 PMKs/s (RTT 2.8)
#2: 'CPU-Core (SSE2)': 304.9 PMKs/s (RTT 2.9)

Unfortunately my laptop has no high-end GPU, I installed cpyrit on my desktop computer at home, ssh from my laptop will do when I’m away.

WHAT IF YOUR LAPTOP WAS STOLEN?
laptop thief.
This article will show you how to gain access to your stolen laptop.

If your laptop was stolen, the first thing the thief would do is to erase the hard drive. A fresh install to the hard drive will lower the chance of tracing your laptop. The best defense to prevent reformatting the drive is to set password to your SETUP UTILITY, disable boot from USB, DVD-ROM and Network, makes it hard to wipe the drive.

All of these are useless if you don’t have access to your stolen laptop. Gaining access is the best weapon to retrieve your machine, once it’s pre-installed, you have a big chance of identifying the thief.

LAPTOP MUST INSTALL THE FOLLOWING:

sudo apt-get install openssh-server openssh-client

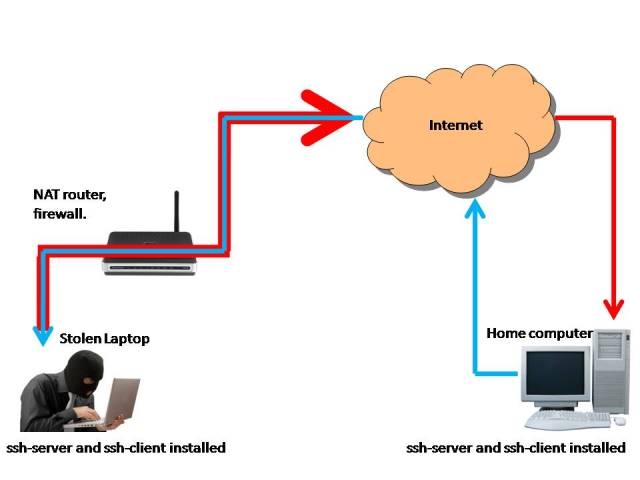
Laptop must have at least two of these packages installed to make all these work. If you don’t know much about ssh, Google is always a friend or you can read my other posts about ssh basic. The idea is your stolen laptop will open a communication path with your home computer where the two hosts could transfer data simultaneously.

1.a.

On this picture above 1.a., the thief will possibly connect to the internet through WiFi cafe, airport, malls, or home router etc. Hence, it will receive private IP(i.e. 192.168.0.100) and that makes your laptop sits behind the NAT. Unless it’s directly connected to the ISP modem.

NAT router stands as a firewall between the internet and the workstation, filters the traffic, blocks unnecessary ports and services to protect the computer from the internet, so connection from the outside is almost impossible. Ssh tunneling makes it possible to tunnel through a restricted firewall, it will open a specified port that will allow an outsider to connect back to the local computer. Furthermore, it uses encrypted tunnel to transfer data.

Computer Users:
debbase = home computer.
vdebbase = laptop.

LAPTOP:

ssh -R 11111:localhost:22 debbase@home_ip_address

This will initiate ssh session to the home computer user name debbase. This command should be executed on the laptop’s terminal, of course the thief will not do that for you. We can write a script that we could run by schedule with cron.

Save this script autossh.exp

#!/usr/bin/expect -f
set timeout -1
set pw "PASSWORD" #USER'S PASSWORD ON HOME COMPUTER
spawn ssh -fN -R 11111:localhost:22 USER@home_ip_address
match_max 100000
expect "*?assword:*"
send -- "$pw\r"
send -- "\r"
expect eof

Make the script executable.

chmod +x /home/vdebbase/autossh.exp

Open crontab.

crontab -e

Type and save this line, this will execute command every 5 minutes.

*/5 * * * * /home/vdebbase/autossh.exp

The red arrow line on the picture 1.a. shows as it tunnels out through the router leaving an open port 11111 for the home computer to connect back using the same port number. Now, once NAT router receive from home computer, it will redirect data to the computer that initiated ssh-session using default ssh port 22.

HOME COMPUTER:
Once ssh tunneling successfully connected. This will ssh back to the stolen machine, gives you a terminal as if you’re in front of your laptop.

ssh vdebbase@localhost -p 11111

1.b.

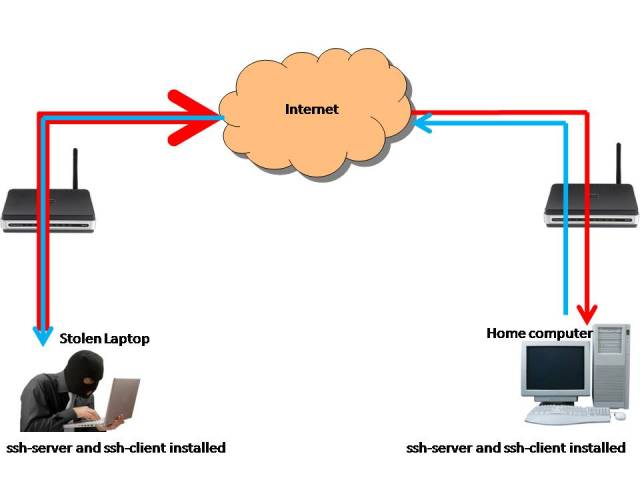
If your computer is behind home router and the IP given by your ISP is dynamically changing, you can register an account like dyndns.org, instead of using IP address you can use dns (i.e. debbase@dyndns.org) and specify the port you want to forward.

ssh -fN -R 11111:localhost:22 debbase@debbase.dyndns.org

You should change and specify this name space in the autossh.exp script.

ssh -fN -R 11111:localhost:22 debbase@debbase.dyndns.org -p 10001

Port forwarding on Dlink dir 300. Port should be specified too.

Once connected to the laptop, you can install logkeys

sudo apt-get install logkeys
sudo logkeys -s -u -o logkeys.file

If you also want to capture an image from a webcam.

sudo apt-get install streamer
streamer -q -o /home/USER/test.jpeg -r 2 -s 640x480

This is useful when you have ssh-server installed in your personal/home computer. You can take a picture of the person playing on your computer while you are away from home.

Installation.

sudo apt-get install streamer

This captures an image from a webcam.

streamer -q -o /home/USER/test.jpeg -r 2 -s 640x480

This record a 10 seconds of video from your webcam.

streamer -c /dev/video0 -f jpeg -o /home/USER/sample.avi -t 00:00:10

One of the best defense against MITM or man-in-the-middle attack. It’s a good idea to secure your traffic especially when you are in a cafe or some other place where you connect your laptop to the internet.

Added:

ssh -D 9999 -C debbase@tunnel.shellmix.com
Apply -C to compress transfered data between ssh server and the local machine. But this kinda inversely proportional. Once -C applied, you will save some bandwidth, but increase cpu load.

Sometimes when you install an application like Mysql the first time, it’s possible to run a problem and mess things up. This will show you how to remove and clean Mysql installation.

Using the Apt command.

sudo apt-get –purge remove mysql-server
sudo apt-get –purge remove mysql-client
sudo apt-get –purge remove mysql-common
sudo apt-get autoremove
sudo apt-get autoclean

Find all the files with “mysql” on / and delete them:

sudo find / -iname ‘mysql*’ -exec rm -rf {} \;

You can also check for an application that depends on Mysql installation.

apt-cache rdepends mysql-server
apt-cache rdepends mysql-client

LAMP stands for Linux Apache Mysql PHP. I will show you how to install LAMP in Ubuntu Desktop 12.04 LTS with PHP5 and Mysql support.


First we use apt to install Apache2 like this.

sudo apt-get install apache2

After installation open up a browser type in localhost or 127.0.0.1 to check if it works.

http://127.0.0.1

Also installing Mysql is available as an Ubuntu package.

sudo apt-get install mysql-server mysql-client

PHP5 and the Apache PHP5 module.

sudo apt-get install php5 libapache2-mod-php5

Created a file info.php or file.php as I use in the video(whatever you like)in /var/www directory

sudo nano /var/www/file.php
<?php
phpinfo();
?>

Restart the Apache2 service to include the file.php

sudo /etc/init.d/apache2 restart

Then check it in a browser.

http://127.0.0.1/file.php

Install php5-mysql package to get Mysql support in PHP.

apt-get install php5-mysql

You can check and install other PHP5 modules you need for your application like this.

sudo apt-cache search php5

We can also install phpmyadmin to manage Mysql databases in web interface.

sudo apt-get install phpmyadmin

We should see it in a browser.

http://127.0.0.1/phpmyadmin

If login page doesn’t show up, you should make links between these files

sudo ln -s /etc/phpmyadmin/apache.conf /etc/apache2/conf.d/phpmyadmin.conf

Then reload the Apache2 service again.

sudo /etc/init.d/apache2 reload

Also you have to make sure you select Apache2 during installation. To redo the installation type this command.

 sudo dpkg-reconfigure -plow phpmyadmin

Aircrack-ng is a suite of tools for 802.11a/b/g WEP and WPA cracking.

sudo apt-get install build-essential
sudo apt-get install libssl-dev
wget http://download.aircrack-ng.org/aircrack-ng-1.1.tar.gz
tar -zxvf aircrack-ng-1.1.tar.gz
cd aircrack-ng-1.1
sudo nano common.mak

Before sudo make && sudo make install. Edit the file common.mak, locate the unused variable by changing the line below.

CFLAGS          ?= -g -W -Wall -Werror -O3

to
CFLAGS ?= -g -W -Wall -O3

Determining the pieces of the program.

sudo make

Install the program.

sudo make install

In the previous video, I already showed you the basic of ssh-keys, generating keys and copying public key to the ssh-Server. Here’s the continuation showing the basic Openssh security configuration. Also how Nmap discover host with open ssh port and brute force with Hydra.

This is the ssh configuration file.

/etc/ssh/sshd_config

This line let you choose specific user to connect to the server.

AllowUsers user

This line will either allow or disallow root login.

PermitRootLogin yes|no

You can specify port number the server will listen onto.

Port port number

This line let you set Warning banner.

Banner /etc/issue.net

locking down user’s home directory

sudo chmod 400 .ssh/authorized_keys
sudo chmod 500 . .ssh

Ssh Server is very useful for remote administration. In my case I installed ssh-server just in case I forgot something from my computer at home I just text my wife to power on my computer type a few commands there I get my presentation I made last night.

This first Video part I made was within LAN. Doesn’t include the Port Forwarding or any configuration in home router for it to discuss the basics.
I’ll make the second part sooner, it’ll be ssh over the internet(Port Forwarding) and more ssh Security. : )

Installing Openssh(server:192.168.0.15)

sudo apt-get install openssh-server

Connecting to ssh-server using Backtrack distro as (client:192.168.0.9). Given the right password you can connect to the server.

ssh vdebbase@192.168.0.15 

Generating private/public key pair. If you want to know the difference between RSA/DSA keys here.
id_dsa(private) = client
id_dsa this pair stay to the computer you connecting from.

id_dsa.pub(public) = server
id_dsa.pub this pair send to the host you connecting to.

ssh-keygen -t dsa

Sending a copy to the host you want to connect. The generated public key is located in .ssh/id_dsa.pub as for Backtrack distro.

ssh-copy-id -i .ssh/id_dsa.pub vdebbase@192.168.0.15

You can check the authorized keys on the server using this command.

cat .ssh/authorized_keys

My friend asked me to reset his Dell Inspiron 1525 password-protected BIOS. At first, I thought it was just a matter of locating, removing and reinstalling CMOS battery on the motherboard and everything will be OK. It clears the BIOS settings including the password. I downloaded the disassembly guide, open-case surgery for an hour until I managed to put everything back. And when I turned the power back on, I ended up scratching my head. The password was still set, asking me for Admin Password again! So I did a research and it’s very clear that Dell has done upgrades, they isolated BIOS password in a small flash chip providing more level of security for the data on the system and contacting Dell is not an option especially from our country because it will take ages before you get a response from them until I ran across this code from a Russian hacker “hpgl” managed to crack the algorithm that Dell is using to generate these backdoor password. You can see the code here

Copy and paste the code

sudo nano dell.c

Compile.

sudo gcc -o dell dell.c

Run the program

./dell

If you are using Windows you can download Windows Binary here
It’s a good practice to scan the file you downloaded.